
In my previous post I built a dice detection library via OpenCV, the idea being that using a small camera I can detect the dice and maneuver a robotic arm to pick it up and move it around, sorting it by color. Well it turns out that was way too easy and a bit lame to take up a whole blog post. Suffice it to say it works unbelievably well.
Instead, I figured maybe I can train a model to recognize hand gestures and have the robotic arm respond to commands made via these gestures. Turns out that is fairly easy too but let’s do it anyway.
Hand gesture recognition is really, really hard. I started off with HAAR Cascades I found on the web and some worked really well. Palm, fist. However I needed at least four and finding the remaining two turned out harder than expected. There are plenty of posts with photos showing it working but for some reason recognizing an “okay” or “vickey” just failed for me.
Instead I pulled out my trusty multi-label Keras model I used previously for X-Ray detection and using a few dozen video clips with frames split out into folders I managed to get together around 2000 training images, 500 for each gesture I want to respond to, split into 4 different folders, one for each class. These are shown below.
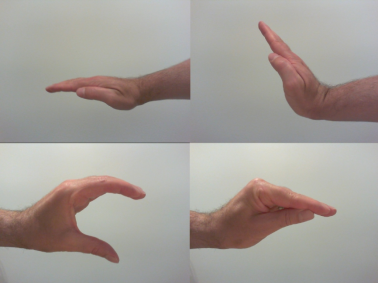
We have flat palm for forward motion, flipped backhand for backward motion of the robotic arm, and then one each to open and close the claw for grabbing.
The Keras model training code in Python is shown below, a very simple model.
import numpy as np
import keras
from keras.preprocessing.image import img_to_array
from sklearn.preprocessing import LabelBinarizer
from sklearn.model_selection import train_test_split
from keras.models import Sequential, load_model
from keras.layers import Dense, Dropout, Flatten
from keras.layers import Conv2D, MaxPooling2D
from keras.callbacks import ModelCheckpoint
from imutils import paths
import random
import pickle
import cv2 as cv2
import os

# set our parameters
BatchSize = 32
Classes = 4
Epochs = 15
InputShape = (64, 64, 3)
data = []
labels = []

print("Loading training data...")
imagePaths = sorted(list(paths.list_images('/home/gideon/Pictures/Hands')))
random.seed(42)
random.shuffle(imagePaths)

# loop over the input images
for imagePath in imagePaths:
    image = cv2.imread(imagePath)
    image = cv2.resize(image,(64,64)) # larger than 64x64 results in a model too big for RPi, this yields 86MB
    image = img_to_array(image)
    data.append(image)
    # augment the data here if required
    # rotate or swap on hor & ver axis

    # train images are spread across four folders based on their classes
    label = imagePath.split(os.path.sep)[-2].split("_")[0]
    labels.append(label)

data = np.array(data, dtype="float") / 255.0
labels = np.array(labels)
mlb = LabelBinarizer()
labels = mlb.fit_transform(labels)

# partition the data into training and test splits (80/20)
(x_train, x_test, y_train, y_test) = train_test_split(data, labels, test_size=0.20, random_state=42)

# construct our model
model = Sequential()
model.add(Conv2D(64, kernel_size=(3, 3), activation='relu', input_shape=InputShape))
model.add(Conv2D(64, (3, 3), activation='relu'))
model.add(MaxPooling2D(pool_size=(2, 2)))
model.add(Dropout(0.25))
model.add(Flatten())
model.add(Dense(128, activation='relu'))
model.add(Dropout(0.5))
model.add(Dense(Classes, activation='softmax'))

model.compile(loss=keras.losses.categorical_crossentropy, optimizer=keras.optimizers.Adadelta(), metrics=['accuracy'])

# train
model.fit(x_train, y_train, batch_size=BatchSize, epochs=Epochs, verbose=1, validation_data=(x_test, y_test))
score = model.evaluate(x_test, y_test, verbose=0)
print('Test loss:', score[0])
print('Test accuracy:', score[1])

# save final model
model.save('hands.model')
f = open('hands.pickle', "wb")
f.write(pickle.dumps(mlb))
f.close()

print("Done...")
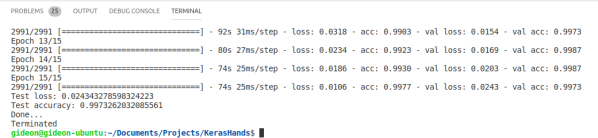
15 Epochs later we had really good results for accuracy and loss as shown here. The model is not going to give us bounding boxes, only a detected class, but that is good enough. If you want bounding boxes use Yolo3 instead.
Assembling the robotic arm is much less enjoyable. For $20 you get a box of screws and some acrylic parts and instructions not even an IKEA engineer could make sense of. If you do buy one of these, make sure to center your servos prior to assembly. You do NOT want to disassemble this thing and start again, trust me. A sense of humor and patience truly is a virtue in this department.
If you are thinking of buying a robotic arm I highly recommend spending more and getting one that is aluminum, with 6 degrees of freedom, a decent claw, and preferably already assembled. Make sure the servos are high-quality with good torque too.
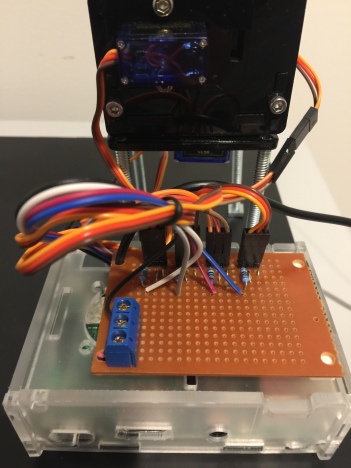
The servos run off 5 volts and need 1500 to 2000 amps ideally, off a separate power supply, and connecting the data pins directly to your Raspberry Pi is not advised, so I built a small circuit to protect the Pi from any malfunctioning servo using four 100K resistors as shown below. You could use one of the more expensive servo drivers available as well. I opted to just make my own.
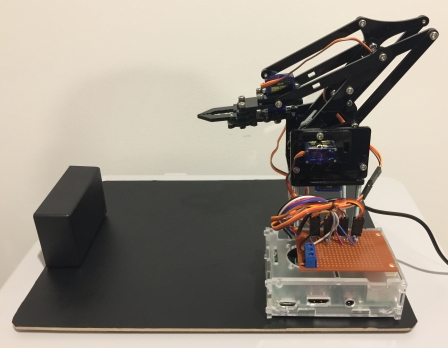
The final assembly with Pi and circuit board is shown below mounted on a heavy board. The arm moves really fast and makes a lot of noise, so make sure you add weight to the floor portion to keep things steady when it’s in motion.
Using the fantastic servoblaster library I wrote a couple of functions to control the arm movements, and then connected it all together with the trained model and image detection code.
My model works off 64×64 input images which keeps the final model under 90MB. Bigger than that and it won’t run on the Pi. If you want to use Yolo3 instead, tiny-yolo is the way to go for sure.
from keras.preprocessing.image import img_to_array
from keras.models import load_model
import numpy as np
import cv2 as cv2
import pickle
import time
import os

model = load_model("hands.model")
mlb = pickle.loads(open("hands.pickle", "rb").read())

state_open = False
state_forward = False
state_changed=False

#
# robotic arm movement functions
#
def ClawOpen():
  os.system("echo 3=2000us > /dev/servoblaster")
  time.sleep(1.5)

def ClawClose():
  os.system("echo 3=500us > /dev/servoblaster")
  time.sleep(1.5)

def ArmForward():
  os.system("echo 4=2000us > /dev/servoblaster")
  time.sleep(1.5)

def ArmBack():
  os.system("echo 4=1100us > /dev/servoblaster")
  time.sleep(1.5)

def ArmMiddle():
  os.system("echo 4=1400us > /dev/servoblaster")
  time.sleep(1.5)

def ArmUp():
  os.system("echo 0=2000us > /dev/servoblaster")
  time.sleep(1.5)

def ArmDown():
  os.system("echo 0=300us > /dev/servoblaster")
  time.sleep(1.5)

def BaseMiddle():
  os.system("echo 1=1300us > /dev/servoblaster")
  time.sleep(1.5)

def BaseLeft():
  os.system("echo 1=2500us > /dev/servoblaster")
  time.sleep(1.5)

def BaseLeftHalf():
  os.system("echo 1=1900us > /dev/servoblaster")
  time.sleep(1.5)

def BaseRight():
  os.system("echo 1=500us > /dev/servoblaster")
  time.sleep(1.5)

def BaseRightHalf():
  os.system("echo 1=900us > /dev/servoblaster")
  time.sleep(1.5)

# Init arm to default starting position and start video capture
ClawClose()
BaseMiddle()
ArmBack()
video_capture =  cv2.VideoCapture(0)

while True:
    ret, frame = video_capture.read()
    if ret == True:
        image = cv2.resize(frame, (64, 64))
        image = img_to_array(image)
        image = image.astype("float") / 255.0
        image = np.expand_dims(image, axis=0)
        proba = model.predict(image)[0]
        idxs = np.argsort(proba)[::-1][:2]

        for (i, j) in enumerate(idxs):
            if ((proba[j] * 100) > 90.00): # 90% or higher certainty before we react
                detected = mlb.classes_[j]
                if (detected == "close"):
                    if (state_open==True):
                        state_open=False
                        state_changed=True
                if (detected == "open"):
                    if (state_open==False):
                        state_open=True
                        state_changed=True
                if (detected =="forward"):
                    if (state_forward==False):
                        state_forward=True
                        state_changed=True
                if (detected =="back"):
                    if (state_forward==True):
                        state_forward=False
                        state_changed=True
            break # only care about the top prediction

        state=""
        if (state_forward==True):
            state=state+"F"
            if (state_changed==True):
                ArmForward()
        if (state_forward==False):
            state=state+"B"
            if (state_changed==True):
                ArmBack()
        if (state_open==True):
            state=state+"O"
            if(state_changed==True):
                ClawOpen()
        if (state_open==False):
            state=state+"C"
            if (state_changed==True):
                ClawClose()
        state_changed=False

        # display current state on lcd as a sanity check
        cv2.putText(frame, state, (10, (i * 30) + 25), cv2.FONT_HERSHEY_SIMPLEX, 0.7, (0, 255, 0), 2)

        cv2.imshow("Output", frame)
        if cv2.waitKey(1) & 0xFF == ord('q'):
            break

video_capture.release()
cv2.destroyAllWindows()
So the idea is that using gestures you should be able to perform basic movements and grab hold of something, like a small plastic bottle. Keep in mind this is a $20 robotic arm so don’t expect it to lift anything heavier than a dry teabag (actually part of their online demo, which now makes perfect sense).
To see the system in action I’ve uploaded a 6 second clip over here: YouTube
It’s very basic, but considering the simplicity of the model and the low cost of the parts, this could make a nice attraction at a trade show, if nothing else.

Nice!
LikeLike